Showing posts with label Internet. Show all posts

Tuesday, 9 September 2014

How To Find BSNL Broadband User Id ?

Most of the time we configure our modems once and leave them untouched because they have an auto connect feature so we do not require to enter our user id/username and password every time we want to connect to internet. This is most basic reason why we forget our username's/user id's and passwords.

BSNL is an Indian Telecom company which also provides broadband through landlines, as discussed above most of the broadband users forget their user id and password as they configure their modem once and after that they set it on auto redial mode. Another reason for forgetting the user id or better to say that not knowing the user id and password is when we apply for a broadband connection, the broadband company simply sends their engineers to set up our modem and after setting up the modem their engineers just walk away without telling us the username and password.

So if you are the one who is finding it difficult to find your BSNL user id and password then you are at the right place. In this tutorial you will find the four ways through which you can find your BSNL broadband user id easily.

So these are the four simple approaches :

  • Finding it on your monthly bill.
  • By using the BSNL self-care portal service. 
  • By using customer care service.
  • By guessing it by yourself.
Lets discuss the first method which is an easy approach as compared to the second method but the second method has its own advantage so we discuss it in details after discussing the first way of finding the BSNL user id. Third approach is also an easy approach but as we all know that BSNL's customer service is pathetic but since it is a way so we would look into it also. And the fourth and last approach is for those who are not able find their BSNL broadband user id by all the three methods.

Finding BSNL User Id on Monthly Bill:

  • If you are a BSNL user from some time and regularly getting your bills then this approach is a better for you because there is not need to register for BSNL self-care portal.
  • So first take out your monthly BSNL bill and see the second page of the bill.
  • Here in the corner you will find your BSNL broadband user id which would look like:
  • [Two Characters][STD code without zero][Your Phone Number][Underscore][Some BSNL Code]
  • Now you have your user id, so you can use it to connect to the internet.

By Using The BSNL Self-Care Portal Service:

  • If you are a new BSNL user and haven't received your first monthly bill from BSNL then you can choose this option.
  • The first thing you have to do is to register an account on BSNL Selfcare Portal. You may find it difficult because BSNL has separate sites for different regions so follow the below tutorial if you don't know your region as well as the other details which are required for registering an account on BSNL Self-care Portal.
  • How To Register For BSNL Self-Care Portal ?
  • After creating an account on BSNL Selfcare Portal, simply Log in with your username and password provided by the BSNL.
  • After that you will be redirected to your account.
  • Now look at the left sidebar and click on My Sevices And then select View Broadband Usage from the list as shown in screenshots.
  • Now you can see your broadband user id, which is given just below the heading "Broadband Usage Details".

How To Get The Password ?

  • By default the BSNL broadband password is "password" itself that is you have to write "password" in the password field.

By Using Customer Care Service :


As we all know that BSNL customer care is not good but still they provide good service in some areas so there is a possibility that they might help you out. So for getting your BSNL broadband user Id and Password dial 1504 (BSNL Broadband Customer Care Number) from your land line phone and ask the customer care executive for your Broadband user id and password. If possible he/she will provide you your broadband id and password.

By Guessing It By Yourself:


As we have already discussed the format of BSNL broadband user id in first method and also we know that the default password is "password" itself so it is not difficult to guess the BSNL broadband user id.
Since we know the format which is:
[Two Characters][STD code without zero][Your Phone Number][Underscore][Some BSNL Code]
So, the first thing we need to figure out is Two Characters.

How To Find These two characters ?


The first two characters of your BSNL broadband user id is generally the first two letters of the name on which land line is registered.

For example: If somebody has a Land line connection with the name "Ajay Singh"then his broadband user id's first two characters would be "aj". Make sure to write these letters in small letters/lower case because all letters in BSNL broadband id are in Lower Case.

Now the Second Field is STD Code, so if you have a land line connection then it is obvious that you know your city's STD code. So from the STD code remove the first number which is generally zero.

For example: Suppose your city's STD code is 0562, so remove the zero from it and use the last three letters that is 562.

Now our Third Field, which is Phone Number. There is no need to discuss it because we all know our phone numbers. So here we are taking an example of phone number so that we can use it to show you how your user id will look like after filling up all the fields.

Sample Phone number: 2212XX7 

Now the Last field, which is BSNL Code, generally they use "ncdr" at the end of the broadband user id but if it doesn't works for you then you can ask the code from any friend living near by you who is using BSNL broadband. Generally BSNL gives the same code to all users for a particular region / area.

So after filling up all the fields from our examples our newly generated BSNL Broadband User id will look like : aj5622212XX7_ncdr

Also Read:
Read more ...

Monday, 1 September 2014

Which USB Data Cards Are Compatible With D-Link DSL 2750U Wireless N ADSL2+ 4-Port Wi-Fi Router

D-Link DSL 2750U Wireless Wi-Fi Router is a great wi-fi router if you use it with a ADSL connection but if you are planning to use it with USB Data Cards then the first thing you should know about this router is, it is only compatible with D-Link Data Cards. So if you want to use it with other dongles then we may suggest you to choose any other Wi-fi router. Many people purchase it without reading the proper reviews about this router. Although its a very good router at affordable prices but since it only supports the D-Link Data Cards so this is the only major drawback of this router otherwise it fulfills all the customers expectations.

Yesterday we contacted their customer care executives three times to know which USB Data Cards are compatible with this router and the devices that they suggested us are listed below. We contacted them thrice so that we could provide you the accurate information and to maintain the integrity of this blog. Because in some cases we have found that some inexperienced / new customer care executives sometimes misguide us and because of their mistakes we have to suffer. So if you want to use this router with USB Data Cards then you can select any one of the device from the given list.

Here's the list of supported Data Cards :
  • D-Link DWP -157 21 Mbps Data Card 
  • D-Link DWP-156 14.4 Mbps Data Card
  • D-Link DWM-156 14.4 Mbps Data Card 
Do you know other Data Cards that are compatible with D-Link 2750U Wi-Fi router ? if yes, Then please share their names and model numbers in comments.
Read more ...

Saturday, 30 August 2014

How To Generate URL For A Flash File ?

In our previous articles we have discussed about how to save a flash file from a website and how to use a flash file on website or blog. So, this is the article which will complete procedure of saving a flash file, generating URL of Flash file and Uploading/using a flash file on website. So we consider that you already have a flash file or if you do not have it yet then you can follow the below article:
Now we have to generate the URL for the flash file so that we can use it on our blogs/ websites. In previous article you will find that we first find out the URL of flash file and then using that URL we download it from the website. So you can also use that URL if you do not want to generate it by yourself. But that method is not a very effective one because the person who has uploaded the flash file can remove it from the server any time so your flash file will also stop working. Hence it is better to upload it on a server or website to get the URL and then copy the generated URL to use it anywhere on the net. So a new question arises:

Where To Upload a Flash File ?

  • You can upload a flash file on Google sites a free service provided by Google.
  • For this simply open http://sites.google.com in your browser.
  • If you already have a Google account then simply log in to Google sites otherwise sign up for a new Google Account.
  • After log in you will be taken to the Google Sites Homepage.
  • Then click on Create tab to create a new site.
  • After that you will be redirected to a new page where you have to fill up some required fields like name of your new site, site location etc.
  • After filling up the fields click on Create tab as shown in below screenshots.
  • After that your site will be created and you will be redirected to your newly created site.
  • Now you have two different ways to upload a file.
  1. By using the settings tab.
  2. By Creating a new page.
So these are the two ways through which you can upload your flash files, we are describing them one by one now its up to you which way you want to choose.

By Using Settings Tab:

  • In your newly created site you can see the Settings tab on the top right corner of your site.
  • Click on Settings tab and then select Manage Site from the list.
  • After that you will be redirected to settings page.
  • Now in the Manage site section, on the left side you will find a field called Attachments.
  • Then click on Attachments and then upload your file as shown in below screenshots.
  • After your file gets uploaded you can see the two options: View and Download.
  • Simply take your mouse over Download, then right click your mouse and select Copy Link Location from the list as shown in below screenshots.
  • Then open Notepad and paste the copied link.
  • Now you can see a URL that contains .swf, so remove everything that comes after .swf as shown in screenshots.
  • Now you have your Flash File URL, copy it and use it where ever you want.

By Creating A New Page:

  • In your newly created site you can see the New Page tab on the top right corner of your site.
  • Then click on New Page tab.
  • After that you will be redirected to a new page where you have to fill up the name of your new page. 
  • So fill the Name Your Page field with your chosen name and in Select A Location section select Put Page Under Home from the list.
  • After that click on Create tab and your new page will be created.
  • In your newly created page you can see an Add Files tab.
  • Then click on Add Files tab and upload your flash file.
  • After your file gets uploaded, take your mouse over the file name and press right button of your mouse and select Copy Link Location from the list.
  • Then open Notepad and paste the copied link into it.
  • Then remove everything that comes after .swf in the URL.
  • Now you can copy your newly generated link of your flash file and use it wherever you want.
Also Read:
Read more ...

Friday, 29 August 2014

Kruti Dev 010 Fonts Not Working In My Browser- How To Fix It ?

So you have downloaded and installed the Kruti Dev 010 Fonts (Hindi Fonts) but still you are not able to see the content in your browser and also not able to figure out the problem. So let us tell you the solution of this problem, actually this is not the problem with your PC, window or in font style itself but the problem is in browser. It is a compatibility issue rather than issue with anything else.

Basically our new browser versions do not support this font style and hence they are not showing it even after installing the fonts. Yesterday while surfing the net we found this issue with a website where the content is not shown properly because of incompatibility issue, the site was asking for downloading the Kruti Dev 010 fonts to show the content correctly but even after downloading it we were not able to see the content. Then first thing we tried that we checked our font directory to ensure whether we have installed the font correctly or not.

While checking our font directory we found that it is correctly installed and PC is showing no issues with it. Then we tried different browsers to see it whether it is working with any one of them but again we found that no browser is showing the content. After that we tried it with compatibility mode in Internet Explorer then we found that our problem is resolved and we could see the content properly.

So this is a case of compatibility issue and if you are the one who is facing the same problem then you can run the website which requires Kruti Dev 010 fonts in Internet explorer with compatibility view mode and also with other browsers by adding an extension in them but if you don't know how to set the compatibility View Mode in browsers then you can follow the below links:
Read more ...

How To Set Compatibility View Mode In Internet Explorer ?

Sometimes while surfing the net we visit some sites that are not compatible with our browsers and they start showing that Browser Not Supported. The actual problem with these sites is that they are designed for older versions of the browsers but when browser developing companies develop new browsers that have additional features or if they change a feature completely then the sites that supports older version of browser starts showing this error.

One more case that we found while surfing the net is the problem with some font styles mainly with those font styles which are of different language like Hindi fonts, Arabic fonts etc. While we were surfing an Indian government website we found that our browser is not supporting the Hindi fonts written in it and the site is suggesting us to download some specific Hindi font to view that content, we downloaded it and installed in our computer but even after installing the fonts the problem remained the same. So we tried to figure out the problem and what we found is that the font supports the older version of the browser, so for viewing the content of that website we require older versions of our browser.

So we have two options either we uninstall our new browser (which we do not recommend) or run our new browser in compatible mode so that it can support the websites that are compatible with older version. The solution of this problem is our old Internet Explore browser, which has a compatibility view mode feature which we can use to view a website in its compatible mode. But if you don't like Internet Explorer then you can also set your other browsers(mainly Firefox and Google Chrome) in compatible mode by using an extension, so if you want to set your other browser in compatible mode then you can read this below article:
So for setting your Internet Explorer browser in compatibility view mode follow the steps given below:
  • Open your Internet Explorer browser.
  • Then Open the website that is not compatible with your current browser.
  • After that click on Tools tab tab which is present on the top right in your browser or see the below screenshots.
  • Alternatively you can also use ALT+X to open the tools.
  • Then select Compatibility View Settings from the list.
  • Now a new window will pop up where you have to add the the URL of the website which is not compatible with your browser.
  • After that click on Add tab and then Close tab.
  • Now refresh your page and it will start running in compatibility mode for that particular website/webpage.
Read more ...

Thursday, 28 August 2014

How To Save Flash Files ?

Flash files always attract us, we can see the flash files on various websites. Nowadays people are using these files all around the web because it always gets the visitors attention and also enhances the looks of a blog/website. So it is very normal that when we see a flash file on a website we want to save it so that we can use them on our blog/website or for some other purposes. But when we try to save it as we save images on our computer then there is no option of "Save Image As". So if that is the case then don't be disappointed, its not a very hard thing to do but requires your little time and effort. So in this article we will discuss the two very popular methods of saving these files.

But before discussing about the two methods its better to know few things about flash files that we require later in this article.
  • Flash files are saved in SWF format with .swf extension, where SWF stands for ShockWave Flash.
  • In this article first we find out the URL of the flash file and then using that URL we would save our flash file to desktop.
The Following two methods are:
  1. By using your Firefox Browser.
  2. By viewing the source code in any web browser.

By Using The Firefox Browser:

  • Every browser developing company tries to provide some unique features in their browser which are different from others so as to maximize the number of their browser users. We often need different browsers because of these different features like in Internet explorer there is a feature called Compatibility View mode which is not present in other browsers likewise Mozilla Firefox also has a different feature called "View Page Info" which is not present in other browsers. This feature is very useful because many a times it saves our valuable time, so we are going to use this feature to save our flash file.
  • So first open the website/webpage(which contains flash file) in your Mozilla Firefox browser.
  • Then Right click your mouse anywhere on the webpage.
  • After that select view page info from the list.
  • After that a window will pop up, then click on Media as shown in screenshots.
  • In Media Files you will find that there are some URLs/Links, so search the URLs that end up with .swf or you can search a flash file URL by seeing the Type in Media Files. In Types these flash files are generally given as embed and object. So copy the URL of your required file or if it is difficult for you to find out which URL is the correct one then you can copy them one by one and accordingly paste them in the address bar of your browser till you get the right one.
  • Now you have got the URL of your flash file, so paste the URL of flash file in the address bar of the browser.
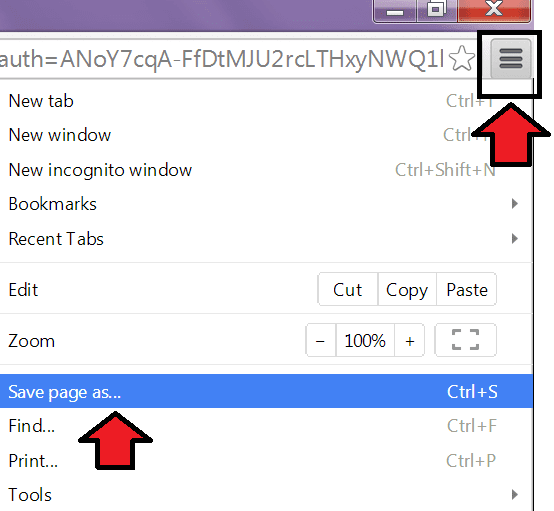
  • Now you can see your flash file, then click on Menu tab which is present on the top right of your browser or see the below screenshot describing the position of the menu tab.
  • Then click on Save Page As and save the file in your desktop.
  • Alternatively you can directly press CTRL+S, this will save the file to your PC.
  • But Make sure that you have saved the file with .swf extension otherwise your file will not run.

By Viewing The Source Code In Any Web Browser:

  • Open the website(which contains flash file) in your browser.
  • Then press the right button(right click) of your mouse and select View Page Source from the list.
  • Alternatively you can also press CTRL+U for the same. 
  • Then a new window will pop up, now you can see the coding of the entire page.
  • Then press CTRL+F and in search bar enter .swf, this will search all the URLs that end with .swf.
  • Now search the URL of the file you want.
  • Then copy the URL of your required file and paste it into the address bar of your browser and press Enter.
  • Now you can see your Flash file in a separate tab.
  • Now click on the Menu tab present on the top right of your browser, then click on Save Page As tab and save your file.
  • Or you can use CTRL+S for the same.
  • Now you have your flash file use it wherever you want.
Don't know how to use it !

Read the below article :
Read more ...

Wednesday, 27 August 2014

How To Set Compatibility View Mode In Firefox ?


Mozilla Firefox logo
While surfing the net we sometimes visit some websites which are not compatible with the new browsers or they require the older browser versions to show the content. Also sometimes webmasters require to check their websites compatibility with the new and old versions of browsers so it becomes frustrating for them to download and install the different versions of the browsers just for checking the compatibility of their designed website. We also miss compatibility view mode when some font styles don't support the new browser versions. 

Although, we can set the compatibility mode directly in the Internet Explorer browser but when we try to find the compatibility view tab in Mozilla Firefox then we are not able to do so because it doesn't have any compatibility mode. So, either we have to try our old Internet Explorer for viewing a particular website or we have to leave it. But those days are gone, now you can also set the compatibility mode in Firefox browser too, not directly but we can use an Extension / Add-On for doing this. So this article is all about this add-on, don't worry its not an annoying add-on rather its a very good add-on. This add-on is very small in size only of few KB's and also doesn't occupies your browser space like other add-ons. So this article will Show you- How to get this add-on ?, How to install it? and How to use it ?.

So to set up the compatibility mode in Firefox browser first we have to download an extension named "IE Tab 2" which is an updated version of its old version "IE Tab". This add on simply convert your Mozilla Firefox browser into Internet Explorer Compatibility View Mode whenever you click on IE Tab button.

How To Get IE Tab 2 Add-On For Firefox ?

  • You can simply download this add-on by visiting IE Tab Add-On provider's website.
  • On their website you will find that they are providing this add-on for both Firefox and Google Chrome but the add-on for Chrome is not available to download at the time of writing this article.
IE Tab Extension Homepage
  • But since we have to download it for Firefox so go ahead and click on Get IE Tab 2 for Firefox.

How To Install IE Tab 2 Add-On In Firefox ?

  • After clicking on "Get IE Tab 2 for Firefox", you will be redirected to a new page, then click on Add To Firefox tab. 
Firefox Add-On Add Page
  • Then it will be added to your Firefox Browser.
  • After that it will ask you to restart your browser so close all the tabs and restart the browser.
  • Once you restart your browser then you will be taken to a new page where it will ask you to install IE Tab Button. So, install it for your ease because the button is so tiny so it will not bother you much but if you don't want to install the button then leave this step because it is optional.
IE Tab Button Page
  • Now you have your browser ready for incompatible websites.

How To Use IE Tab 2 Add-on ?

  • Open the website in Firefox which is incompatible with your browser.
  • Then click on IE Tab Button and now you can see it has converted your browser into Internet Explorer Compatibility View Mode.
IE Tab Button Location In Firefox
  • Also you can see that it has resolved your incompatibility issues.

Alternate Method To Use IE Tab 2 Add-On:

  •  If you don't want to install IE Tab 2 button in your browser then you can simply right click on the page that you want to view in compatibility mode and select "View Page In IE Tab" from the list.
  • Then your browser will start running in Internet Explorer Compatibility View Mode and you can see your incompatible website without any problem.

Read more ...

Tuesday, 26 August 2014

How To Create A BSNL Selfcare Account ?

BSNL offers Self Care Portal Service to its customers so that they can easily subscribe to its services from home. Basically BSNL calls it BSNL Web Self Care / Customer Care Portal Service, where you can enjoy the various services offered by the BSNL such as view your availed services, apply for a new Landline connection, new broadband connection, new mobile postpaid connection, track your services, track your connection requests, Pay bills, view past payments, make complains for any inconvenience, track your complains, view your broadband user id, view your broadband usage etc.

So, if you are a new BSNL user or you don't know how to register an account on BSNL self care Portal then you can follow this article. Basically BSNL has divided its network in four regions which are East region, West region, North region and South region and hence they have created separate portals for each region. So you should to know your region to register on BSNL self care portal, if you don't know your region then don't worry simply try registering on each regions self care portal with your customer id, if the region and customer id matches then BSNL will show you the green signal to register on its self care portal otherwise it will show you an error message saying "The Customer ID or Email entered is Invalid or User ID exists. Please Reenter" or in some other regions websites it will show a message "Please enter a valid customer Id".
So below are the URLs of these 4 regions self care portal websites simply copy the URL of your region and paste it in the address bar of your web browser and then follow the article for next steps:

East Region:
http://selfcare.edc.bsnl.co.in
West Region:
http://selfcare.wdc.bsnl.co.in
North Region:
http://selfcare.ndc.bsnl.co.in
South Region:
http://selfcare.sdc.bsnl.co.in
After visiting the BSNL self care portal website, follow these simple steps:
  • Click on User Registration and fill the required details as shown in screenshots. 
  • If you don't know your customer Id then take out your BSNL monthly bill and look into it, you will find it on the top right corner of the bill or you can see the below snapshot of the bill describing where to find your BSNL customer Id.
  • After filling up the form click on the Submit Tab.
  • If you have registered successfully then it will show you a message:
Your registration request has been successfully submitted to BSNL For the user id : xxxxxx. The call center agent from BSNL shall get back to you for verification to approve the request. Subject to verification, your log in credentials will be sent to you at: email address
  •  If in the above message your email address is missing then don't worry there is no need to panic, after all its a government website.
  • After that their customer care executive will call you in two or three days after the registration for verification and then they will send you your selfcare user Id and password on your email. 
Note: Some times they don't call you for verification and directly send your self care user Id and password to your email.
  • After verification you will receive a mail from them which will look like:
  • Now you have your BSNL self care user id and password which you can use to log in to your self care account.
Also Read:
Read more ...